Blog
How to recover Accidentally Deleted Files or Lost Important Data on Mac ?
4 Ways to Recover Accidentally Deleted Files on Mac & Windows PC
Deleting an important file by mistake – we all have been there at least once in a lifetime. If you are stuck with a similar situation on your Mac or Windows PC then don’t worry. You can successfully restore the accidentally deleted file if you notice it early and take quick action.
MacBook Repair Dubai experts have found some simple fixes to restore accidentally deleted data on Mac. Let’s see how you can proceed with the recovery process on your computer.
How to Restore Accidentally Deleted Files on Mac?
Pressing the Delete button while choosing the unintended file can make an important one disappear. Fortunately, it might not be deleted forever. A MacBook Repair in Dubai confirms that the file must be in the Trash folder if you haven’t removed it permanently.
Apart from the Trash supremacy, you can count on the Mac’s Time Machine feature. This specific feature can recover a particular timeline and its data on your Mac in the blink of an eye. However, you must have backed up your Mac data to this utility so that you can restore the required file.
Let’s understand how you can recover mistakenly deleted files on a Mac computer with step-by-step guidelines:
1. Undo Your Last Action
Do you immediately realise that you have deleted an important photo, document, or any file out of mistake? MacBook Repair services in Dubai are quite confident that you can access that particular file again just by undoing your last activity.
However, the ‘undo’ option won’t work if you permanently delete files or empty the Trash folder. Otherwise, you can undo your last action or deletion with the following steps:
- Hover over the Edit option from the upper portion of your Mac screen.
- Afterwards, select ‘Undo Move’ from the Edit menu.
Alternatively, you can use a dedicated keyboard shortcut to undo your last action. Use the Cmd + Z key shortcut to reverse your deletion. Remember, this hack will only work if you have just deleted a file and haven’t permanently deleted it.
2. Retrieve Deleted Files from Trash
Where can you find all the recently deleted files and folders on your Mac? It’s the Trash folder that keeps all your deleted data until you clear them out forever. However, Trash is the utility that can give you the data back as well.
For instance, you select and drag a particular file to Trash and confirm the deletion. At this point, the file stays in the Trash and isn’t out of the system unless and until you empty the Trash folder. So, your deleted files are safe until you clear out Trash.
A MacBook repair service near me instructs how you can restore data from Trash quickly:
- Go to Trash on the desktop screen and open up the folder. All your deleted files will be listed here.
- Now, search for the file you have accidentally deleted. Select the required file and drag it to its original position. Otherwise, you can right-click the file and choose the ‘Put back’ option.
By now, files should return to their appropriate location on your Mac. Keep in mind that this method only works if you don’t empty the Trash folder after accidentally deleting or losing an important file.
3. Use Time Machine Backup
Apple has an intuitive backup solution for Mac users and that is Time Machine. This backup feature makes file retrieval easy even if you have emptied the Trash folder. However, you must have enabled Time Machine backup to recover deleted data on your Mac.
MacBook Repair dubai technicians warn that this method will be of no use if you haven’t created any backup. So, you can proceed with a Time Machine backup if and only if you have activated the feature and have backups.
Now, let’s have a look at the necessary steps shared by a MacBook repair service in Dubai:
- If applied, connect the backup media to your Mac. This can be an external storage device or anything compatible storage option on which you have created a Mac backup earlier. Additionally, the backup should have the file you have deleted by mistake.
- Afterwards, launch the Time Machine utility on your Mac. Either search for Time Machine using Spotlight or Finder. Or, click the Time Machine icon from the menu bar and select ‘Enter Time Machine’.
- Then, locate the particular files you need to recover with the help of a Time Machine backup. Use the on-screen navigation arrows to find those files and preview each of them by pressing the Space Bar key.
- After that, you can select the required file and click on the Restore button.
Your deleted files should return to their original habitat on Mac.
4. Utilise the Terminal
Are you still trying to recover a deleted file and don’t want to use third-party software? Then, use the Terminal utility to retrieve the deleted file from the Trash folder. However, there’s a catch with this hack. You must not empty Trash after the accidental deletion until you try the Terminal window to get your files back.
According to MacBook Repair Services Dubai, here’s what you can follow:
- Head towards Finder → Applications → Utilities. Next, double-click on the Terminal option to launch it.
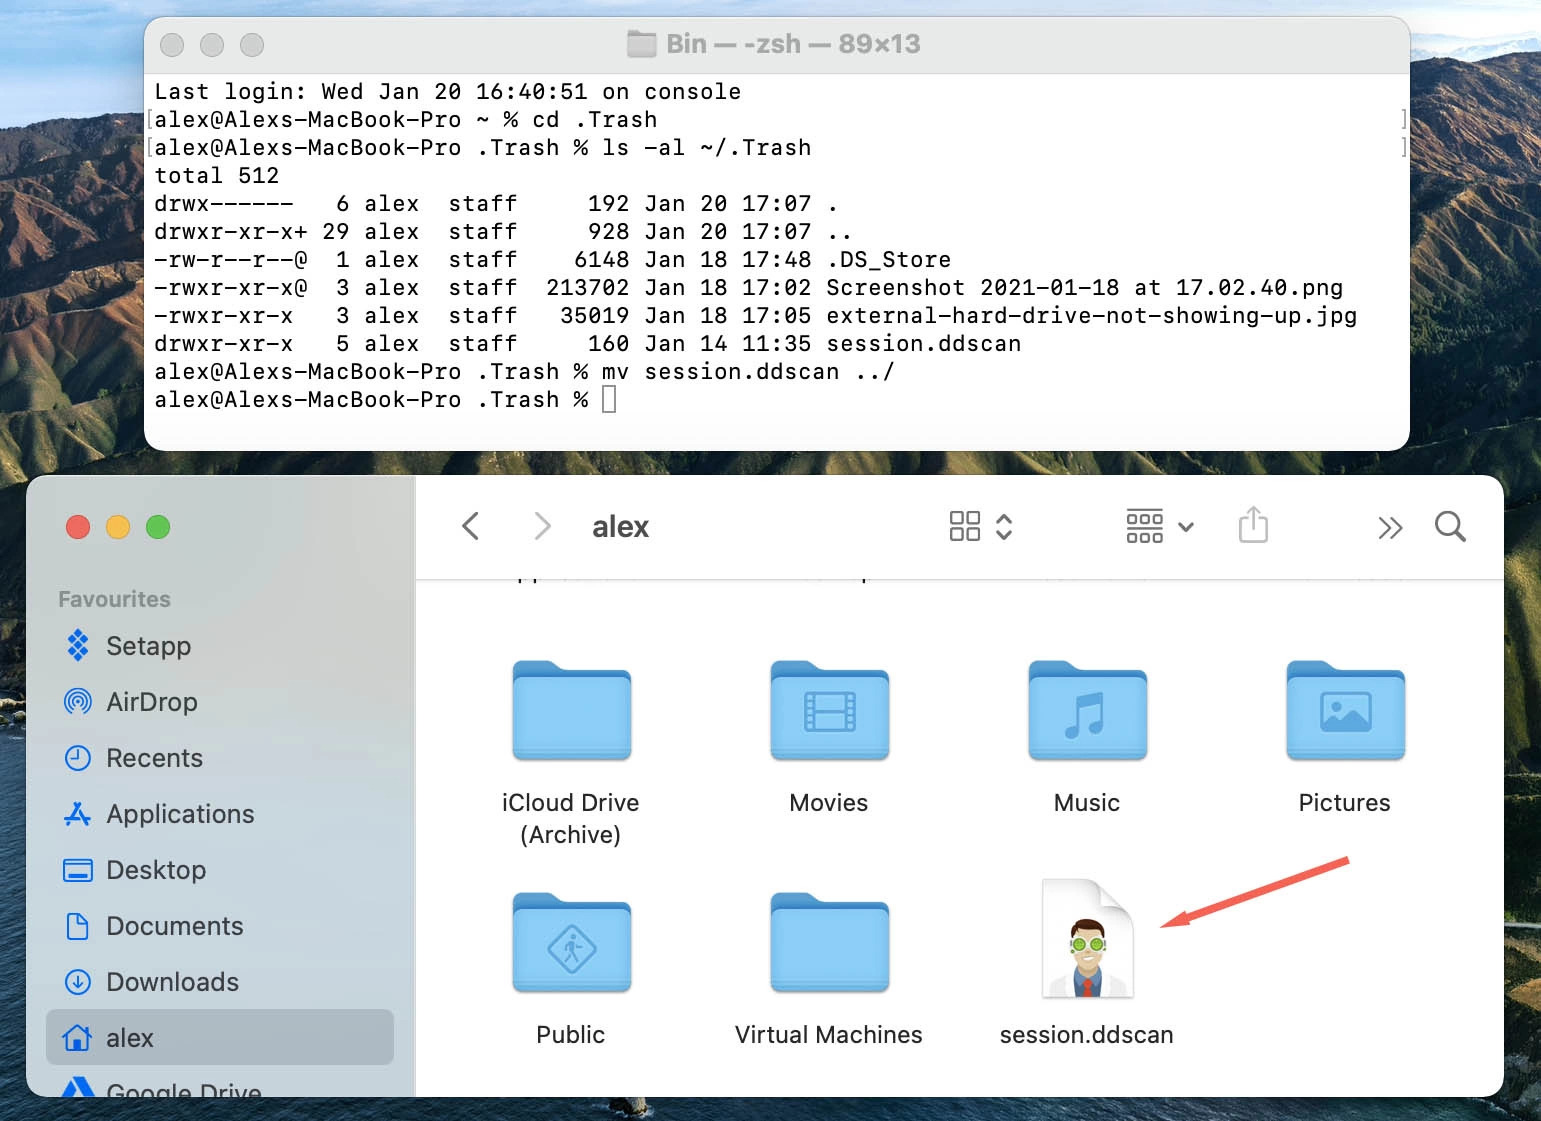
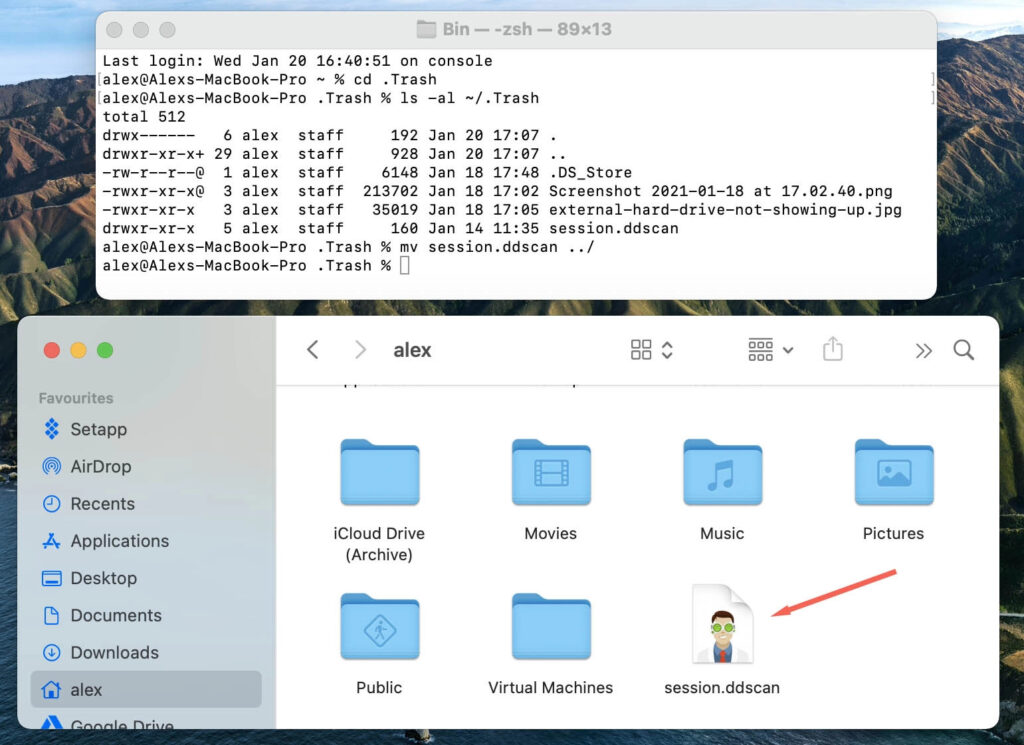
- Then, input the command ‘cd.Trash’ and press the Return key.
- Now, enter the following command and hit Return: ‘Is -al ~/.Trash’. This command will allow you to view the content of the Trash folder.
- Enter ‘mv file_name ../’ and press Return. Here, replace file_name with the exact and full name of the file that you want to restore from the Trash folder.
- Finally, you can type Quit on the Terminal window to close it.
You will find the recovered file in the home directory folder on your Mac.
How to Recover Deleted Files on a Windows PC?
Like Mac, losing your essential files on Windows computers can be equally frustrating. Thankfully, the Windows operating system offers some handy methods to retrieve your data without deploying third-party software. A MacBook repair in Dubai mentions the following useful methods for emergency data recovery situations:
1. Restore from Recycle Bin
Mac sends all the temporarily deleted files to the Trash folder. Windows has its Recycle Bin to store all the files or data that has been deleted by the user. So, you can sneak into the Recycle Bin folder as soon as you realise that the last deletion was an accident.
Here’s how you can restore a deleted file on a Windows PC, as mentioned by a MacBook Repair service near me:
- Double-click the Recycle Bin folder to open it up. It’s a trash can icon on the desktop screen.
- Now, you can view what’s inside the Recycle Bin folder and locate the deleted file that you want to restore.
- Right-click the file and select Restore from the menu.
In the blink of an eye, the intended file will be restored to its original position.
2. Use File History to Restore Deleted Files
The built-in File History Backup on the Windows operating system can help you out if you don’t back up your files regularly. To activate the File History Backup utility, here’s what you have to proceed with:
- Press the Windows logo key from the keyboard and click on Settings.
- Next, select the Update & Security option from the main Settings window.
- Head towards the Backup option and choose ‘Add a drive’.
- After that, you need to select a network location or external device to store your File History backup.
Once you enable the File History backup, you can follow the steps below to restore any file or folder you have deleted by mistake.
- Press the Windows and S keys together to launch the Seach utility. Type ‘restore’ and select the search result that says, ‘Restore your files with File History’.
- Thereafter, locate the file that you want to restore. You can also use the arrows to see all the versions of that specific file.
- After you get the version you need, choose Restore to save the file. This will push the file back to its original location on your PC.
In case you want to save the file in another location rather than its original one, right-click on the file. Choose the ‘Restore to’ option and opt for a new location.
3. Recover Files from a Backup
Do you keep regular backup files on an external media storage or drive? If yes, then MacBook repair services in Dubai recommend the following steps to restore the deleted file from a specific backup option:
- Connect the external drive to your Windows PC. If it’s an online drive, make sure that it’s available at the moment.
- Now, click on the Windows logo from the Taskbar and navigate to the Control Panel.
- After that, choose System and Maintenance followed by Backup and Restore.
- Next, click on ‘Restore my files’ and follow the on-screen guidelines.
4. Try to Restore Previous Versions
Have you activated the System Restore utility on your Windows PC? If yes, then you can easily restore previous versions of the File System on your computer and that will contain the deleted file for sure. MacBook Repair Dubai professionals guide you on how to use the facility to get accidentally deleted data:
- Open the File Explorer directory with the Windows + E keyboard shortcut.
- Now, locate the folder that has the lost or deleted files.
- Right-click on the folder and choose ‘Restore previous versions’ from the menu.
- Make sure that you opt for a version that has the file you want. Finally, you can hit the Restore button.
Additional Workarounds…
Are you out of options for your Mac or Windows PC when it comes to data recovery? For guaranteed assistance in accidental deletion instances, you can try third-party data recovery tools. Otherwise, you can contact a MacBook repair in Dubai if you are looking for data restoration for your macOS device.